
fredsaid2
New Member
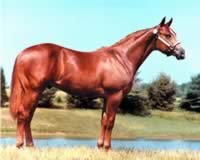
From Behind the Bit: Conformation photos: Tips and tricks . Seems like good info.
So how do you take a good conformation shot?
This advice is geared to folks interested in conformation shots, although I suppose some of principles apply to other types of shots. As is often the case, this advice has been compiled from the resources listed at the bottom--I'm not a photographer myself.
1. Select the site.
Choose an uncluttered area -- no cars, equipment, etc.
Choose a site with a "contrasting" background, e.g., don't stand up a palamino in a sand ring.
The area directly behind the horse should be more or less the came color or intensity throughout.
Find a site with level ground. If you can, identify a reference point (such as a fence or groundline) to gauge horizontal balance.
2. Pick a good day and time of day.
Best times of day are about an hour or two after sunrise or before sunset. The light at this time will add a "glow."
If you want more sharpness, shoot in the late AM or early PM (e.g. 10 am or 2 pm).
Shoot with the sun behind your shoulder and slightly from the rear of the horse.
For most horses, a bright overcast day is best. Overcast light is more evenly distributed, with fewer harsh shadows.
For black, grey, or white horses, pick a more overcast day or low angled sun. They require a lot of side lighting to show the detail in their muscles as they move.
When shooting in bright daylight, use a flash to eliminate shadows.
3. Prepare your horse.
Your horse should be immaculately clean.
Braid your horse if he has a nice neck.
Shoeing should be recent, hooves polished.
Use a leather halter/lead or bridle (cleaned, polished).
Get your horse used to the tripod and other equipment. Ask two friends to help.
Have them block out a few hours.
One will hold the horse, and one will get the horse's attention.
4. Position your horse.
Set up the horse in the designated location.
The height of the camera should be the middle of the barrel.
The camera should be positioned directly across from the girth area.
The camera should be at a distance so that the horse "fills up" the frame.
The cannon bones of the legs nearest the viewer should be vertical; the far feet should angle slightly inward so that all four feet are visible. The horse should cover a lot of ground, but should not be "parked out."
Turn the horse's head slightly toward the camera.
For a dressage prospect, the neck should be slightly elevated; hunters should be stretched out and down.
The horse should look alert and curious, with the neck arched.
5. Take the photos!
Walk the horse forward into the standing postion. Do not back them into it.
One assistant should hold the animal, the other should stand 20 feet in front with a bag, some grain, or a lunge whip to get the horse's attention.
The session could last 1-2 hours, giving the horse frequent breaks.
Try different "distractors" -- grain, lunge whip, etc.
Take many, many photos.

 Candids can be cute, but they don't tell the buyer a whole lot (other than Pebbles will tolerate little Susie hanging off his neck).

